Claims

About Claims

If a loss occurs on an insured shipment, a claim must be submitted. In most cases, the printed certificate of insurance will have specific instructions for beginning the claim process.

One of the first steps will usually be to submit a First Notice Of Loss (FNOL). The FNOL can be submitted through the system, and will be automatically sent to the appropriate claims representatives at the insuring companies. Once the representatives acknowledge and accept the FNOL, it will become a claim.

The status of the claim can be viewed through the system to track the progress.

Click a link below to view a specific topic:

Searching for a Claim Finding a claim within the system.
Reporting a Loss Submitting a First Notice Of Loss (FNOL) to begin the claim process.
Adding Notes and Documents to an FNOL or Claim Attaching and emailing notes from a claim, or adding supporting files.
Reporting a Loss Without Logging On Submitting a First Notice Of Loss (FNOL) without logging into the system.
Verifying the Status of a Claim Without Logging On Viewing the status and details of a claim without logging into the system.

Searching for a Claim

Once a First Notice Of Loss (FNOL) has been submitted, it is available in the system and users can check the status. It can be found using a range of options such as the status, dates, values, policies, or a variety of other search criteria.

Note: An FNOL or claim can be verified without having to log on first. Anyone with the claim information may verify the shipment status and details, even if they do not have an account.

How to Perform a Basic Search

Steps

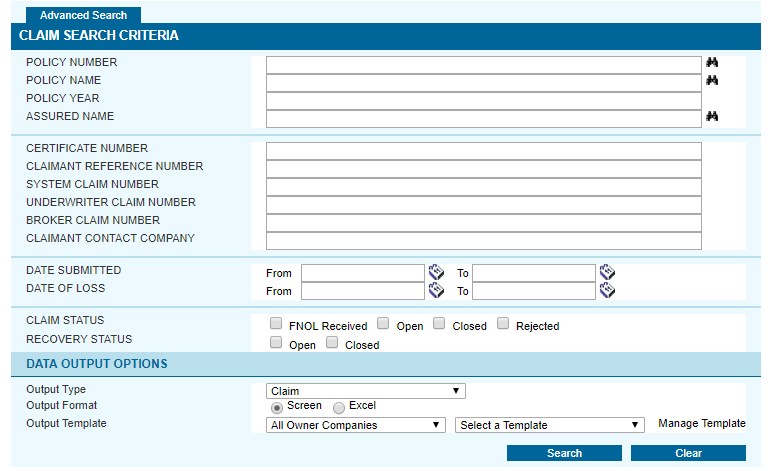
  1. In the main menu bar, open the Claims menu, and select Claim Query/List. The Claim Search Criteria page opens in the basic format.

  2. Enter any combination of search options, or leave all fields blank and click Search to view all available FNOLs and claims. All fields are optional.

    Policy Number / Policy Name

    Enter either the policy name or number. A search can be performed using the first few characters of the policy name or number.

    Or you can select either one from the lookups, which will automatically fill in both fields and the Policy Year.

    Policy Year Enter the policy year the shipment is insured under. This will be the same year as the effective date of the policy.
    Assured Name

    Enter the primary assured name. A search can be performed using the first few characters of the name.

    The lookup may also be used to select it from the system.

    Certificate Number Enter the certificate number generated by the system when the shipment was created. The full numeric certificate number must be included, without any dashes or letters that may appear on the printed certificate.
    Claimant Reference Number Enter the reference number chosen by the person who submitted the claim.
    System Claim Number Enter the system generated number assigned to the claim when it was created.
    Underwriter Claim Number Enter the number assigned to the claim by the underwriter. This number may not have been assigned.
    Broker Claim Number

    Enter the number assigned to the claim by the Broker. 

    Note that this number may not have been assigned and is not mandatory.

    Claimant Contact Company Enter the company listed for the claimant when the FNOL was submitted.
    Date Submitted Enter a date range to find claims submitted during that period, or select the dates from the calendar lookups.
    Date of Loss Enter a date range to find claims related to losses that occurred during that period, or select the dates from the calendar lookups.
  3. Select the Claim Status and Recovery Status. Multiple status options may be selected. If no options are selected, all statuses will be found, including claims still in the First Notice Of Loss stage.

    Claim Status Select the status options to view claims with those statuses. To view FNOLs, do not select any Status options.
    • Open
    The claim is open and active.
    • Closed
    The claim has been resolved and closed.
    • Rejected
    The claim has been rejected. The reason for the rejection will be shown in the Status section of the claim.
    Recovery Status Recovery activities may continue after the claim itself has been resolved and closed. Select either option.
    • Open
    Recovery is still in progress.
    • Closed
    Recovery has been completed and closed.
  4. Select the appropriate Data Output Options.

    • Output Type: This field defaults to Claim, and cannot be changed.
    • Output Format: The search results can be viewed on the Screen, or opened in an Excel document.
    • Output Template: When Excel is selected as the Output Format, the report template can be selected here. Select the owner company the template was created for, and then select from the available templates. The Manage Template link, if available, can be used to modify the templates.
  5. Click Search to find the claims, or click Clear to reset the form and choose new criteria. The search results will depend on the selected output format.

    • Output to screen: If the system finds multiple search results, the Claim Search Results page opens above the search criteria form, allowing for changes to further refine the result.

      Click a link in the Date Submitted column to view detailed information about the claim. If there is only one match the system opens the claim directly.

    • Output to Excel document: The search is performed in the background, and a message will appear once the report is ready.

      When ready, the report will be available in the Data Output Center, found under the Tools menu.

How to Perform an Advanced Search

Steps

  1. In the main menu bar, open the Claims menu, and select Claim Query/List. The Claim Search Criteria page opens in the basic format.

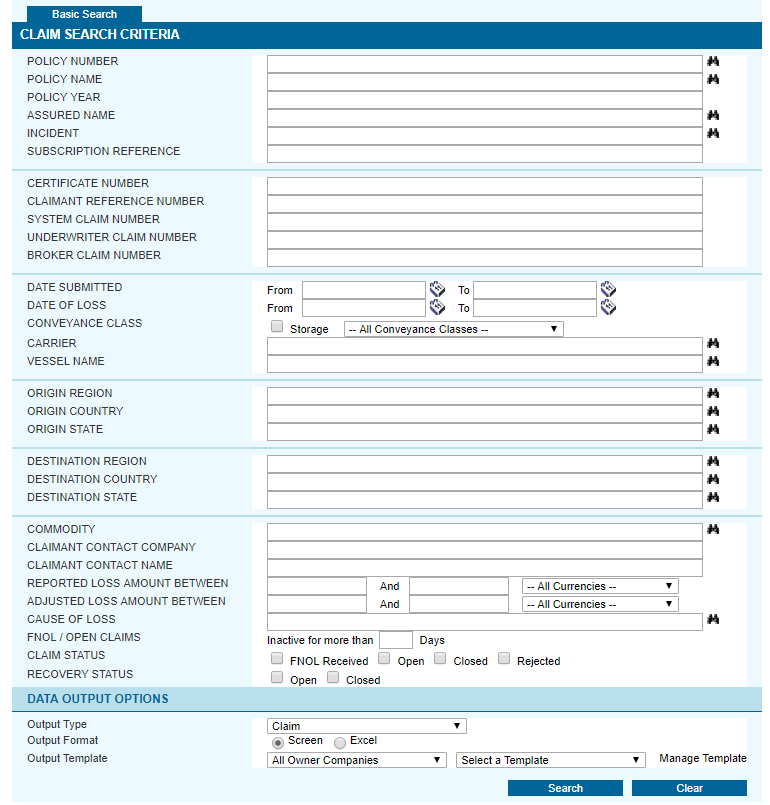
  2. Click the Advanced Search button to view additional search options.

  3. Enter any combination of search options, or leave all fields blank and click Search to view all available FNOLs and claims. All fields are optional.

    Policy Information:

    Policy Number / Policy Name

    Enter either the policy name or number. A search can be performed using the first few characters of the policy name or number.

    Or you can select either one from the lookups, which will automatically fill in both fields and the Policy Year.

    Policy Year Enter the policy year the shipment is insured under. This will be the same year as the effective date of the policy.
    Assured Name

    Enter the primary assured name. A search can be performed using the first few characters of the name.

    The lookup may also be used to select it from the system.

    Incident If one or more claims are related to a particular incident, the incident may be entered to retrieve just those claims.

    Reference and system generated numbers:

    Certificate Number Enter the certificate number generated by the system when the shipment was created. The full numeric certificate number must be included, without any dashes or letters that may appear on the printed certificate.
    Claimant Reference Number Enter the reference number chosen by the person who submitted the claim.
    System Claim Number Enter the system generated number assigned to the claim when it was created.
    Underwriter Claim Number

    Enter the number assigned to the claim by the underwriter.

    Note that this number may not have been assigned and is not mandatory.

    Broker Claim Number

    Enter the number assigned to the claim by the Broker.

    Note that this number may not have been assigned and is not mandatory.

    Dates and conveyance information:

    Date Submitted Enter a date range to find claims submitted during that period, or select the dates from the calendar lookups.
    Date of Loss Enter a date range to find claims related to losses that occurred during that period, or select the dates from the calendar lookups.
    Carrier

    Once a policy has been selected, and if a maritime conveyance has been selected, claims can be found based on the carrier used for the shipment.

    Enter the Carrier Name and select it from the lookup.

    Vessel

    Once a policy has been selected, and if a maritime conveyance has been selected, claims can be found based on the vessel used for the shipment.

    Enter the Vessel Name, and select it from the lookup.

    Origin and destination information:

    Once either the Origin Country or Destination Country is selected, both fields will be filled in automatically.

    Enter any or all locations involved in the shipment related to the claim. Each option may be entered manually or selected from the lookups.

    Contact information and amounts:

    Commodity

    Enter a partial or complete commodity description or click to select it from a list.

    A list does not appear if you have not filled in the policy information boxes above.

    Claimant Contact Company Enter the company name listed for the claimant.
    Claimant Contact Name Enter the contact name listed for the claimant.
    Reported Loss Amount Enter a value range to find claims whose reported loss amounts fall within that range.
    Adjusted Loss Amount

    Enter a value range to find claims whose adjusted loss amounts fall within that range. The adjusted loss is the calculated amount after the claims representatives have reviewed the claim.

    This amount is not shown on the claim form, but may have been provided by the representatives.

  4. Select the Claim Status and Recovery Status. Multiple status options may be selected. If no options are selected, all statuses will be found, including claims still in the First Notice Of Loss stage.

    FNOL / Open Claims

    Enter a number of days to view any FNOLs or claims that have not had any activity for more than that number of days.

    Claim Status

    Select the status options to view claims with those statuses. To view FNOLs, do not select a status options.
    • Open
    The claim is open and active.
    • Closed
    The claim has been resolved and closed.
    • Rejected
    The claim has been rejected. The reason for the rejection will be shown in the Status section of the claim.

    Recovery Status

    Recovery activities may continue after the claim itself has been resolved and closed.

    Select either option.

    • Open
    Recovery is still in progress.
    • Closed
    Recovery has been completed and closed.
  5. Select the appropriate Data Output Options.

    Output Type This field defaults to Claim, and cannot be changed.
    Output Format The search results can be viewed on the Screen, or opened in an Excel document.
    Output Template

    When Excel is selected as the Output Format, the report template can be selected here. Select the owner company the template was created for, and then select from the available templates.

    The Manage Template link, if available, can be used to modify the templates.

  6. Click Search to find the claims, or click Clear to reset the form and choose new criteria. The search results will depend on the selected output format.

    • Output to screen: If the system finds multiple search results, the Claim Search Results page opens above the search criteria form, allowing for changes to further refine the results.

      Click a link in the Date Submitted column to view detailed information about the claim. If there is only one match the system opens the claim directly.

    • Output to Excel: The search is performed in the background, and a message will appear once the report is ready. When the document is ready, the report will be available in the Data Output Center, found under the Tools menu.